
With the Club Planner Partner API, an external party — your web agency, a marketing tool, an accounting package or your own app — can read data from your platform or write data into it. That access always runs through an API key that you create, restrict and revoke yourself.
This article explains how to create such a key, which rights to grant, and exactly what to pass on to the external party.
1. Before you start
Agree on a few things with the external party first:
- Which data they need (members, calendar, sales, check-in, …).
- Whether they only need to read, or also write (change or add data).
- Whether the integration is temporary — then give the key an expiry date.
The tighter you set up the key, the safer. You can always add rights later. You need access to Settings to manage API keys.
2. Where to find your API keys
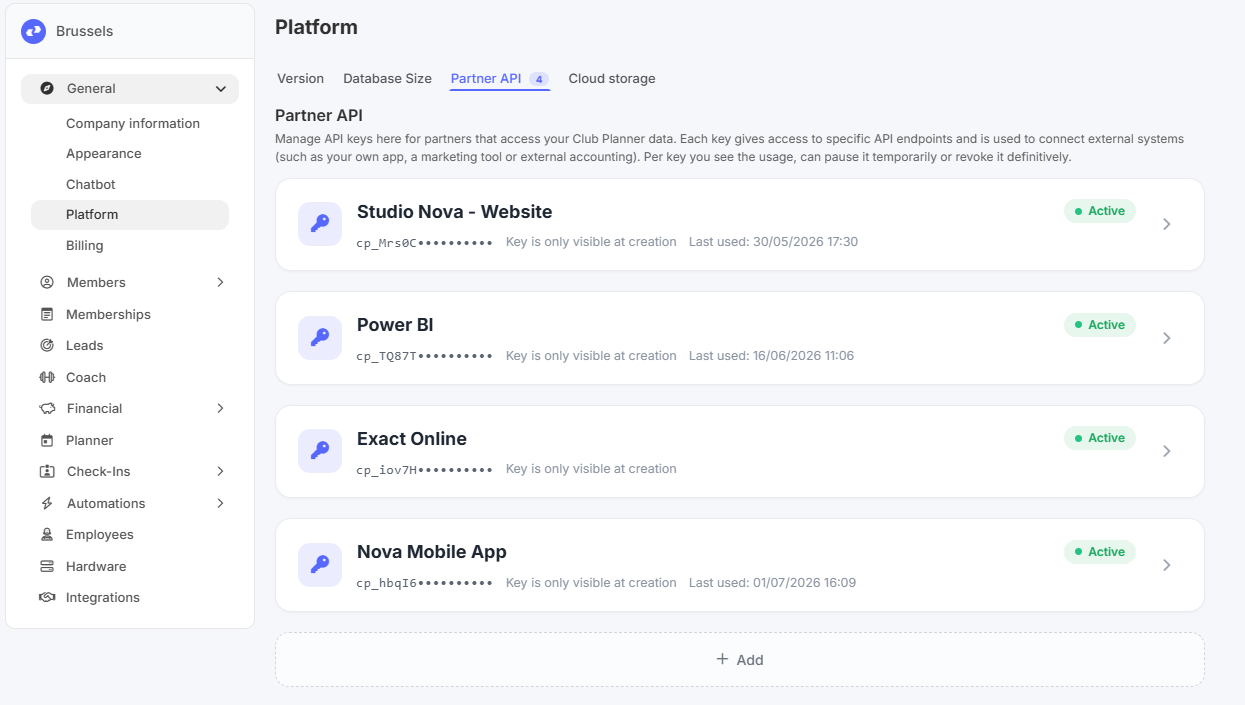
In Club Planner, go to Settings → General → Platform and open the Partner API tab. You will see every existing key on your platform; the number is shown next to the tab name.
3. Creating a new key
Step 1 — Start a new key. Click Add below the list. If you have no keys yet, click Create API key.
Step 2 — Key name. Enter a clear name at the top, for example Studio Nova - Website or Exact Online. Use one key per partner or per application: that way you can stop one integration without affecting the others.
Step 3 — General.
- Club — which club the key is intended for. With a single club, leave this on All clubs.
- Expires on — optional end date. From that date onwards the key stops working, so pick the day after the last day it should still work. Leave empty for a key without an end date.
Step 4 — Usage and logging.
- Request limit — the maximum number of calls the key may make, and over which period (Every 5 minutes, Every 15 minutes, Hourly, Daily, Monthly or Total). The default is 25 every 5 minutes.
- Logging — Off, Normal or Full. With logging on, every call is recorded (time, method, path, status code, duration, IP). Useful while setting up an integration or when troubleshooting.
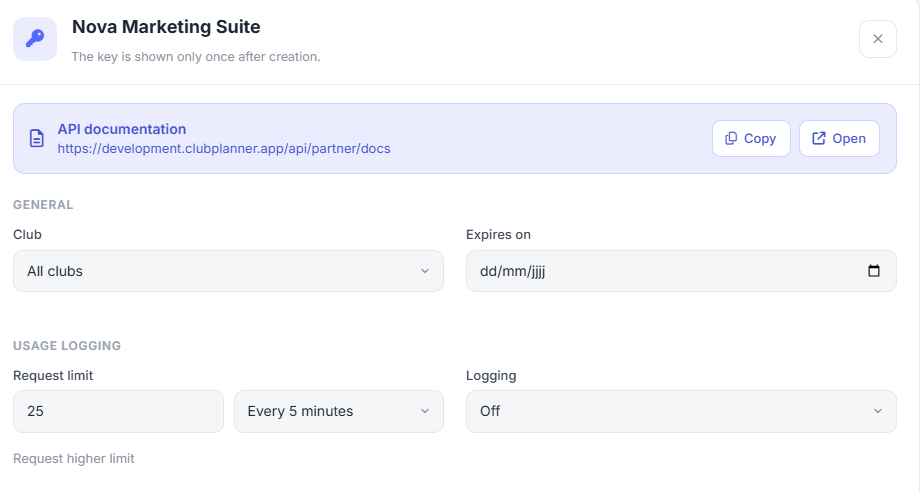
Need a higher limit? Anything above the default of 25 calls every 5 minutes requires an override code. Click Request higher limit and contact Club Planner support to obtain the code. Without the correct code the key cannot be saved.
Step 5 — Access. Here you decide what the key may do per area. For each one you choose between (none), Read-only and Read + write.
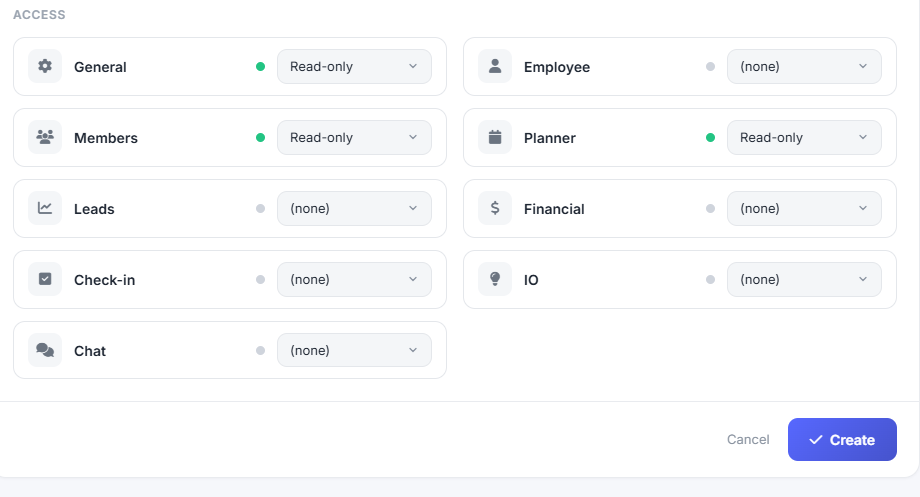
- General — club details, opening hours, payment methods, documents, e-mail templates, tasks and platform logs
- Employee — employees: list, details and picture
- Members — members: record, subscriptions, payments and contracts, credit, visits, status/blocking and communication
- Planner — calendars, activities, calendar items and reservations
- Leads — leads (prospects), their sales steps and the sales calendars
- Financial — POS sales, member credit, money in/out, balances, catalog items, revenue and POS groups, coupons, invoices and orders
- Check-in — member QR codes, connecting devices, checking members and employees in and out
- IO — light and gate control via a Loxone relay
- Chat — conversations from the chatbot on your website (read-only)
- Coach — the exercises and workouts from Coach: the club's own library and the workouts assigned to members
Set everything the partner does not need to (none). A key that only has to retrieve data should be Read-only everywhere.
Step 6 — Create and copy the key. Click Create. The key now appears once, in a separate window.
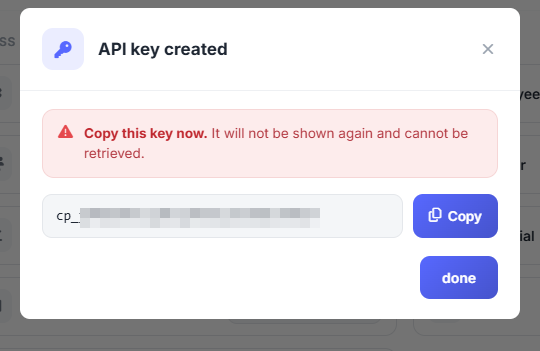
Copy this key immediately. It will not be shown again and cannot be retrieved — afterwards you will only see its first characters for recognition. Lost it? Simply create a new key and delete the old one. Click Copy and store the key safely (for example in a password manager), or paste it straight into the message for your external party.
4. What to pass on to the external party
The API documentation block at the top of every key holds the link to the full technical documentation of your platform. Click Copy to take the link, or Open to review it yourself. It looks like this:
https://[your-clubplanner-address]/api/partner/docs
That page lists all available endpoints, with the exact fields and sample code. A developer needs nothing more. A ready-to-send message:
- Documentation: https://[your-clubplanner-address]/api/partner/docs
- Base URL: https://[your-clubplanner-address]/api/partner/v1/
- API key: cp_…
- Send as a header:
X-API-Keyon every request (Authorization: Bearer <key>also works) - To test:
GET /api/partner/v1/pingfor connectivity, thenGET /api/partner/v1/clubto retrieve the rightclubId - Granted rights and limit: state which areas you opened up and which request limit you set
Do not send the key through a public channel, and never publish it in code that ends up in a browser or app.
Tip for technical partners: anyone working with AI tools (Claude Desktop, Cursor, …) can use the official MCP server @clubplanner/partner-api-mcp. It adds the key automatically and lets the assistant discover every endpoint by itself. The full explanation is at the top of the documentation page.
5. Following up and managing an existing key
Click a key in the list to expand it.

- Active / Not active — the switch at the top pauses a key temporarily without deleting it.
- Last used — shows when the key last made a call. Handy to see whether an integration is still alive.
- Log — the button under the logging settings shows every call per day: time, method, path, status, duration and IP address. Click a line to expand the details.
- Change rights — adjust the levels under Access and click Save.
- Delete — via the bin icon. The key stops working permanently.
Changes take effect within a minute; the external party does not need to restart anything.
6. Common error messages
- 401 — key missing, invalid, expired or deactivated. Is the key set to Active? Has the Expires on date passed? Is the
X-API-Keyheader sent correctly? - 403 — the key lacks sufficient rights for that area. Set the relevant area under Access to Read-only or Read + write.
- 404 — the endpoint or the data does not exist. Check the path in the documentation.
- 429 — the request limit has been reached. Raise the Request limit (override code required) or have the partner call less frequently.
When in doubt, set Logging to Full: the log then shows exactly which calls come in and what status they get.
7. Good practice
- One key per partner or application — so you can revoke one integration without disturbing the rest.
- Grant only the rights that are needed and preferably start with Read-only.
- Set an expiry date for temporary projects or trials.
- Share the key through a secure channel and keep it in a password manager.
- Collaboration ends? Deactivate or delete the key straight away.
- Check now and then the Last used column and clean up keys nobody uses.